Table of Contents
The Next Generation Has Arrived: Designing a Tricorder A Portable Sensing Device with a User Interface
Students: Aaron Pacter, Joseph Sanu
Project Adviser: Professor Mokhtar Aboelaze
Course Director: Professor Ebrahim Ghafar-Zadeh
Group Members
Joseph
Bio: Joseph is a 4th year computer engineer who is keen on developing innovative applications and challenging himself with new problems.
Role: Choosing sensors, input devices and architecture to use for the main board. Designing software and front housing. Calibrating sensors, testing software, user interface and output devices and the system as a whole.
Aaron
Bio: Aaron is a 4th year computer engineering student who interests are databases, software design, and embedded systems.
Role: Choosing sensors, output devices and architecture to use for the sensor board. Designing software and rear housing. Testing sensors, output devices and the system as a whole.
Description of Project
We aim to design and construct a multipurpose handheld device with many different sensors that will allow for various unique applications. Our motivation for this project is the rising popularity for handheld communication devices with multiple sensors. These built in sensors together measure motion, orientation and various environmental conditions. These sensors have great value in giving the user a great interface and making the use of applications such as games more enjoyable.
We will come up with a select number of programmes for our Tricorder and determine which sensors are needed for them to work. Appropriate hardware and software architectures to run and display our applications on a small handheld device will be selected. Finally, the entire hardware will be enclosed in an aesthetic case which is designed to be lightweight and portable.
Objectives
- Put to practical use the many concepts taught during our undergraduate studies into this project.
- Design software showcasing two of the Tricorder’s main functions.
- To have fun in the process.
Discussion
Novelty
Non-barometric altimeters such as the ones in modern phones are not good for practical use. The novelty of such apps is their selling point and these applications can provide some altitude estimation through the use of GPS recievers. They are however not nearly accurate accurate for use in an aircraft or use in recreational activities such as mountaineering or skydiving. Even while maintaining a steady altitude, the indicated altitude oscillates. This means if you are calculating the total climb distance, it will add on based on the changes in indicated elevation resulting in an inaccurate calculation.
Our altimeter app makes use of a barometric pressure sensor which can be used to calculate the altitude with an accuracy down to 15 cm. The pressure sensor offers a measuring range of 300 to 1100 hPa which means it can be used for altitudes up to 15,000 meters. We have options to allow the user to easily recalibrate if there are pressure changes triggered by the weather. With this mind, it is clear how our product is preferable when compared to the altimeter applications in phones.
Marketability
To market our product, we have designed a simplistic and friendly graphical user interface with touch screen input for calibration. Our display module is enclosed in a sport case which is lightweight and portable for recreational use. Existing barometric altimeters on market offer little in terms visual impression on the user and interactivity. Our altimeter coupled with the other applications makes our Tricorder a versatile tool.
Engineering design process
We made use of the Engineering Design process from start to completion. This process was divided into five separate steps. The first is obtaining requirements, which was researching various options on what we want tricorder to do. This is based on how expensive the sensors are, their usefulness and adaptability. Also whether or not practical applications can be successfully created given the time and resources available to us. The second step is the design process which is determining the design of our tricorder. This means deciding on our GUI, COM board, the display module and type of connection to read sensor data. The third step is the implementation of our design through tools mentioned in the section below. The final steps of the process where testing to ensure the software worked as initially proposed and finally maintenance to tweak or make minor adjustments to enhance our product.
Images (Setup/Schematics)
Design Choices
Processor
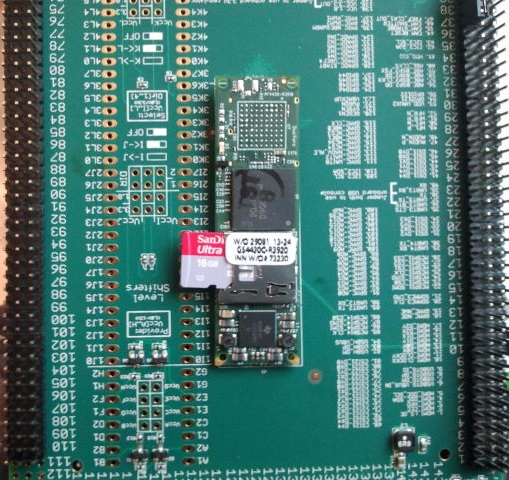
Using the KISS design principle, we decided early on to use a Computer on a Module for our main processor. That way the hardware architecture would already be connected to the processor, leaving us more time to deal with other design decisions. We ultimately choose a Gumstix Overo processor, that uses the ARM-A8 architecture, is compact (58 mm x 4.2 mm), lightweight (42 g), includes 512 MB NAND ROM and a Micro SD port to store software.
Input / Output Methods
It was known right from the start that an LCD module would be used to display any sensor data. But, what was not known was what input methods would be used for a user to interact with the User Interface of the Tricorder. As the initial design shows, we considered using push buttons which would allow for tactile sensation when a user presses them. When choosing the LCD module, we considered a non-touch screen version, a resistive touch screen version and a capacitive touch screen version. The resistive touch version could only detect one touch gesture at a time, while a capacitive touch version could detect multiple. Do to cost, we chose the resistive touch version, was able to get that working, so we decided to remove the push buttons, and just use touch gestures on the LCD module for user input. We chose a 4.3“ Samsung Resistive Touchscreen LCD with 480 x 272 pixel resolution.
Casing
In choosing the material for our case, we wanted something durable, light weight, not expensive, be easy to obtain and be malleable enough so that it could be designed by a variety of methods. We quickly decided on acrylic plastic as our material of choice. It met all the criteria, and we have experience with it. To shape, cut or mold the acrylic, we considered three options, a laser cutter, a 3D printer and mill the acrylic. A laser cutter is available from the Faculty of Arts Design Program, but there is a cost, it cannot make angle cuts for beveling, and students in that program would have priority to use it before us. A 3D printer is available from the Department of Electrical Engineering and Computer Science Department, it is free, there is no wastage, but research has shown that these cases tend not to be the most durable and there is some leeway between dimensions wanted to be printed and what actually is printed, resulting in sanding the printed plastic to get the desired dimensions. With milling, the various tools in the Design Shop could be used to make the case to our specifications, it was freely available, and we could choose the plastic we wanted to use, so it could be the exact colour we wanted as well. Ultimately, we ended up going with milling the plastic, because we could get the exact colour and shape we wanted, and we would be directly involved in every step of this design process.
Ports
- Ethernet
- USB
- Audio Stereo In
- Audio Stereo Out
- Mini USB for Serial Communication
- Charging Jack
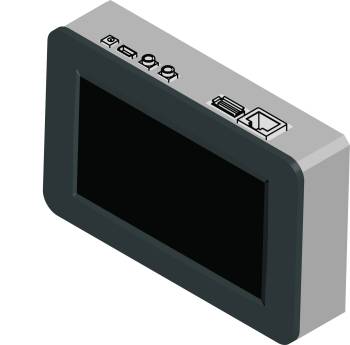
When deciding on what ports to choose for the Tricorder, we first decided what was needed and then we choose extra ones. The Tricorder had to be portable, so it needed a portable power source, a battery. A battery needs to be charged, so a charging jack was needed. Also, we wanted to have the ability to connect with a computer for programming purposes. This lead to a mini USB port which can establish a serial connection to a computer. We also wanted the ability to connect peripherals such as a USB flash drive, so a USB port was decided upon. The audio stereo in, audio stereo out and Ethernet were additional ports. We thought about the most important ports a computer has, and implemented those on the Tricorder for future use.
Printable Circuit Board
We wanted to design and build from start to finish, a Printable Circuit Board (PCB) that would have all the sensor so that they could connect to the main board. However, many of the sensors have connections which require soldering pins with a distance 0.5 mm between each other. After much research, we determined that we would not have the facilities to that, the cost having it outsource was beyond the budget, and methods that we could try (toaster oven, skillet, etc.) could potentially damage the sensors, and we determined the risk was not worth the reward. To solve this, we would individual breakout boards for the sensors, soldered connectors and connected them to the main board.
Results
Sensor Testing
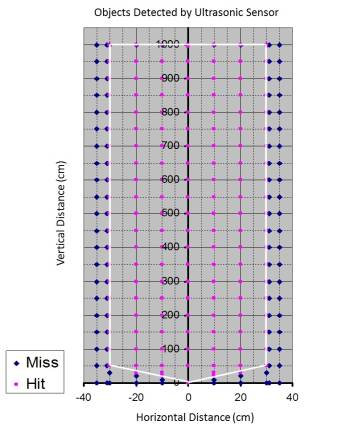
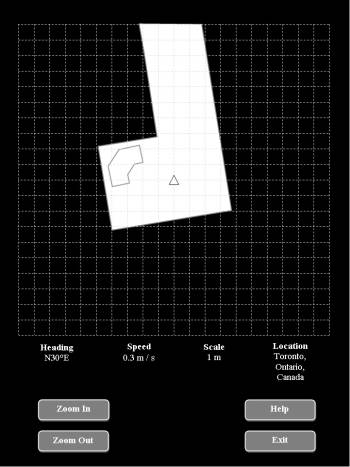
A 30 cm² piece of plywood was used to see if the ultrasonic proximity sensor would detect it, when the face of the board was facing the front of the sensor. The sensor worked exactly as expected. Objects located within the polygon outlined in white were detected and outside were not. No objects greater than 10 m from the sensor were detected and any detected object located less than 50 cm from the sensor was measured at 50 cm. This sensor has an accuracy of 1 mm.
Software
Spatial
Using GPS to determine location on Earth, a digital compass to determine bearing, an accelerometre to measure changes in linear velocity, a gyroscope to measure changes in angular velocity, and an ultrasonic proximity sensor to determine distances to objects, a simple mapping system is designed. The triangle in the middle represents the Tricorder’s position, white represents areas explored and black represents unexplored areas.
Atmospheric
Using a digital pressure sensor to calculate relative and absolute pressure, and a temperature sensor to measure the ambient temperature, a system for mountain climbing is designed. The person represents the Tricorder’s position, brown represents the amount climbed, and white represents the amount remaining to climb.
Future Work
Spectrometre Using light rays to determine the chemical composition of what is being viewed.
Audio There is an audio stereo out jack that allows for audio to be heard by connecting speakers or earphones, and an audio stereo in jack that allows for sounds to be recorded by connecting a microphone. To embedded speakers and a microphone to the device would allow for sounds without external connections.
Camera There are sensors that takes readings of light, but not of visible light. Having a camera would solve that.
Casing To have a fold-top design for the casing would be it more convenient to carry around and make the casing more aesthetically pleasing.
Touchscreen Upgrading to a capacitive touch screen would allow for the screen to be able to detect multiple touches at the same time (i.e. for a zoom in or zoom out gesture).
Internet The Tricorder has a ethernet port, so it is not too difficult to implement Internet connectivity.
Sponsors
Uploaded Files
Demonstration Jan. 8th movie.mpg
Video
Lassonde ENG4000 Project (2013-14) - Group 10 http://youtu.be/gPOSzc_sno0


